RIPRA VÁŠ PDMS PARTNER
Import dat do PDMS
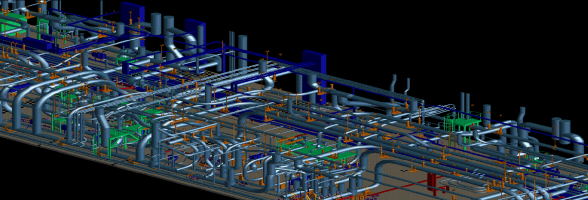
14.11.2012 15:18PDMS ImPLANT-I je převaděč dat z Integraph 3D modelu v soubor typu ISFF(Intergraph Stnadard File Format) do PDMS přes PDMS Design macro soubory nebo do REVIEW pomocí modelových souborů. Také lze přeložit všechny přidružené Intergraph Design Review (*.drv) soubory do formátu Cadcentre File Format (ASCII), ty pak mohou být zpřístupněny v rámci REVIEW.
1.2 Input to PDMS ImPLANT-I The input to PDMS ImPLANT-I consists of ISFF Design Files, which are generated from microStation applications, Version 4 or above, or compatible products. ISFF files are graphics files, which normally have the file extension .dgn. The interface works in read-only mode and so ISFF data will not be at risk.
1.3 Output from PDMS ImPLANT-I The output of the program is either an ASCII macro file (suitable for input to PDMS), or a REVIEW model file. No databases are created in PDMS If attributes associated with the design files are to be output to REVIEW in Cadcentre Attribute File Format, then the associated Design Review files (.drv) attribute files must be present.
2 Using PDMS ImPLANT-I When using PDMS ImPLANT-I you will be driving it via the Cadcentre Command Processor. You must specify the type of file to be generated (PDMS or REVIEW) and the names of the ISFF Design Files whose graphics are to be exported. Note that a number of engineering items may be stored in one ISFF file. When transferring data to PDMS, PDMS ImPLANT-I will transfer all the engineering items into a single PDMS database element. The database element will typically either be a PDMS ZONE (containing a number of EQUIpment elements) or a STRUCTURE element. PDMS ImPLANT-I will allow you to specify the PDMS element type (EQUIPMENT or STRUCTURE) and its name (if any). More than one ISFF file can be input for each PDMS or REVIEW output file, and more than one PDMS or REVIEW file can be generated within one PDMS ImPLANT-I session. PDMS ImPLANT-I has a macro-processing facility that enables you to create a file of commands (called a macro) using a standard editor, and then ask PDMS ImPLANT-I to process the commands in that file. Therefore, you do not have to enter all commands interactively every time. An alternative approach is to generate the PDMS ImPLANT-I script automatically with, for example, a Visual Basic program, or a Perl script. PDMS ImPLANT-I includes several commands designed for use in such scripts.
2.1 Overview A typical session using PDMS ImPLANT-I can be divided into the following stages:
- Start up PDMS ImPLANT-I.
-
You must specify the following:
- The distance units used in the ISFF file.
-
You can optionally specify the following:
- How the microStation primitives are going to be grouped in PDMS/REVIEW. • The curvature coarseness (or arc tolerance).
- A shift factor of the model, in millimetres. • Which parts of the ISFF model to exclude from the transfer. • How surfaces will be imported into PDMS or REVIEW (that is, hollow or solid).
- Steel profile parameters. • Whether you want commands and/or messages stored in a file.
- Whether a separate Equipment is to be generated for each primitive.
- You specify the Attribute Filename for output (if required). The output of attributes can be toggled on and off for each ISFF file processed.
- You specify either the PDMS Design macro or the REVIEW model filename.
- You specify the ISFF filename whose 3D graphics are to be exported. PDMS ImPLANT-I reads the ISFF file and appends the appropriate data to the current output file (that is the PDMS macro file or the REVIEW model file), according to the parameters set at Stage 2.
- You can either finish the session or repeat the process from Stage 2 to export more files.
2.2 Default Operation
By default PDMS ImPLANT-I does the following:
- By default, all the primitives generated will be under an EQUIPMENT element. Normally, all ISFF entities are grouped under the same EQUI. However, when a CELL is encountered in the ISFF file, a new EQUI is generated. When the import of the CELL is complete, the elements that follow in the ISFF file are grouped below another new EQUI, and so on. To generate a separate equipment for each primitive, you can use the GROUPPRIMITIVES OFF command. You may also use the GROUPPRIMITIVES command to limit the number of primitives in each EQUIPMENT or STRUCTURE.
- You can specify the name of the PDMS element to create using the ISFF command. If you do not specify a name, the ISFF filename is used instead. You may alternatively indicate that the element should be anonymous, or that no top-level element should be created.
- The curved lines in the microStation surfaces are approximated into straight segments and the curved surfaces around a projected curved surface are approximated to convex planar faces. You can control the way the curved parts are approximated into a number of straight segments or planar faces using the APPROX value which ranges from 1 (very coarse, less faces/segments) to 10 (very smooth, more faces/segments). The default is 5.
- PDMS ImPLANT-I will output all ISFF surfaces as SOLID primitives by default.
- The default is to INCLUDE ALL the primitives for export.
- Attributes will not be output by default.
- PDMS ImPLANT-I has no default units.
2.3 Units in PDMS ImPLANT-I MicroStation works internally in terms of position units (also known as units of resolution), but also displays master units and sub-units (also known as working units). PDMS and REVIEW work internally in millimetres, but can interact with the user in many other units. In order to successfully translate an ISFF file for PDMS or REVIEW it is necessary to convert the units in the ISFF file into millimetres. The ISFF file contains two-letter abbreviations of the names of the master unit and the sub-unit, but these abbreviations are not standardised, and so the translation is not automatic To display the ISFF unit information from a file, use the Q UNITS command. For example, if the file you are working on is called example.dgn you should type:
Q UNITS /example.dgn :
This will produce a message like:
Master Units : ME
Sub-Units : MM
Resolution:
1000 : MM per ME
80 : Pos Units Per MM
Global Origin : 0.000000 0.000000 0.000000:
In this case, the microStation user has chosen to use metres as the master unit, millimetres as the sub-unit, and has one eightieth of a metre as the position unit.
The recommended way to set the units is with the UNITS command. If the master unit is one of METRE (or METER), CM, MM, YARD, FOOT or INCH you should use that keyword. In this case you would type:
UNITS METRE
If the master unit is not one of these, you should supply the length of a master unit in millimetres. In this case you could type:
UNITS 1000
as a metre is one thousand millimetres, but UNITS METRE is recommended.
2.4 Example PDMS ImPLANT-I Session
The following example shows a typical session using PDMS ImPLANT-I. References are made to the stages described in Section 2.1 at the appropriate points. Some of the commands in the example are described in detail in Section 2.3.1.
Text in italic indicates what the user is typing.
PDMS ImPLANTI (stage 1)
PDMS ImPLANTI Version v.v.v (OS n.n) (mmm dd yyyy)
Copyright Cadcentre Ltd yyyy to yyyy
* Q UNITS /turb1.dgn (stage 2)
Master Units : M
Sub Units : MM
Resolution:
1000: MM per M
80 : Pos Units per MM
Global Origin: 0,0 0,0 0,0
*UNITS METRE (stage 2)
*GENERATE PDMS /file1.model (stage 4)
*ISFF /turb1.dgn (stage 5)
*ISFF /turb2.dgn (stage 5)
*STRUC (stage 2)
*GENERATE PDMS /file2.model (stage 4)
*SOLID (stage 2)
*ISFF /pipe1.dgn (stage 4)
*MESSAGE /message (stage 2)
*GENERATE REVIEW /file3.model (stage 4)
*APPROX 3 (stage 2)
*HOLLOW (stage 2)
*EXCL BOX (stage 2)
*EXCL COL 0 (stage 2)
*SHIFT 2000.0 3000.0 0.0 (stage 2)
*GROUPPRIMITIVES OFF (stage 2)
*ATTRIBUTES /file3.att (stage 3)
*ISFF /*.str /BUILD (stage 5)
*MES END (stage 2)
*FINISH (stage 6)
2.4.1 Notes on the Example Session
The commands used in the example are described in detail below:
GENERATE PDMS /file1
Open a PDMS Design macro file called file1.mac which will hold the PDMS commands for importing 3D data taken from the ISFF files specified by the next ISFF commands. Every GENERATE command closes down any previous opened files. I
SFF /turb1.dgn
Read the file turb1.dgn for 3D data and generate the PDMS commands for import to PDMS DESIGN. The PDMS primitives generated will be under the PDMS ZONE element called /turb1.dgn as no zone name was specified.
SOLID
After giving this command, any ISFF surfaces will be output as solids. This command should be used, for example, when exporting pipes, so that tubes or bends are exported as cylinders and circular toruses and
not as faceted models. The SOLID command is the default and produces solid models.
UNITS METRE
See Section 2.3.
STRUC
From now on any PDMS elements generated will be of type STRUCture. To switch back to EQUIPment use the command EQUIP. The STRUC command sets the mode so that the ISFF command generates the PDMS hierarchy STRUC/SUBST/Geometric primitives (BOX etc.). The EQUIPMENT command sets the mode so that the ISFF command generates the hierarchy ZONE/EQUIPMENT/Geometric primitives (BOX etc.). In EQUIPMENT mode, the primitives are packed into the same EQUI until a microStation CELL entity is encountered. Then a new EQUI is generated. If GROUP ON is set in addition to EQUIPMENT mode then a new EQUI is generated for each micro station primitive. Note that the STRU and ZONE PDMS elements take the name of the ISFF file supplied.
APPROX 3
Change the curvature approximation to 3 (more coarse than the default value of 5).
GROUPPRIMITIVES
Stops primitives being grouped into arbitrary hierarchies. This is important if attributes are being output.
ATTRIBUTES /file3.att
For all geometry files processed by following ISFF commands, process the corresponding attribute files with the same names and output the results in a Cadcentre Attributes file named file3.att. The attribute files normally have the file extension .drv, and their format is shown in Appendix B.
The ATTRIBUTES filename command opens a new attributes file and switches attribute processing on. Opening an attributes file will close any attributes file that is already open. ATTRIBUTES END closes the attributes file. The output of attributes can be toggled on and off.
Note: PDMS ImPLANT-I maintains cell ownership and REVIEW segments within a cell segment inherit the attributes of the cell segment. In other words, the segments within a cell do not have attribute entries within the Cadcentre Attributes file, only significant segments do.
ISFF /*.str /BUILD
Read all files with extension .str which have been generated by microStation and append the primitive records to the REVIEW file file3.model. The wild-card characters that can be used are the same as the Unix ls command, or the Windows dir command. If you wish to use file names which include spaces, or certain other characters, you must use single quotes around the name, and you cannot then use wild-cards.
EXCLUDE BOX
From now on do not export boxes. To include them back again in this example the commands INCLUDE ALL or INCLUDE BOX can be used.
EXCLUDE COL 0
After this command has been given, primitives with colour 0 will not be exported. To include primitives with colour 0 again, the commands INCLUDE ALL or INCLUDE COL 0 can be used. Note that sometimes microStation users use colour 0 to create a face that they subsequently use to create a projected surface, or surface of revolution object with a different colour. In this case there will be a clash of colour between the construction face colour (that is 0) and the object’s colour as they occur in the same place. To avoid this clash of colours, in REVIEW export only, exclude colour 0 from the model.
Most of the EXCLUDE/INCLUDE options are self-explanatory. However there are some options that describe microStation type of primitives/records and others describe 3D type of models as generated by PDMS ImPLANT-I.
The microStation types of primitives/records are described in the MicroStation Reference Guide and these are: CELL, TRUNCATED CONE, CAPPED SURFACE, SURFACE, SURFACE OF REVOLUTION.
Other element types referenced by the EXCLUDE command:
CURVED SOLID Any solid that has been recognised as curved and which does not fit into the standard curved primitives such as circular torus, rectangular torus etc.
PLANAR SOLID Any solid that does not have curved parts and does not fit into the standard primitives such as box, pyramid etc.
SHIFT 2000.0 3000.0 0.0
The SHIFT command specifies a shift in millimetres for the model.
MESSAGE /message
MES END T
he MESSAGE command specifies an output file where all user commands and output messages can be stored. The MES END command closes the file.
—————